Create Your First AI Voice Agent
Use this page as the complete configuration guide for the first reusable AI Voice Agent.
The agent you create here can later be attached to inbound routing, outbound campaigns, Phone tests, and workflow automations.
This page covers the full agent setup: Voice, languages, speak providers, greeting message, contact template variables, LLM, functions, transcription, and Agent settings.
1. Create the agent and configure Voice
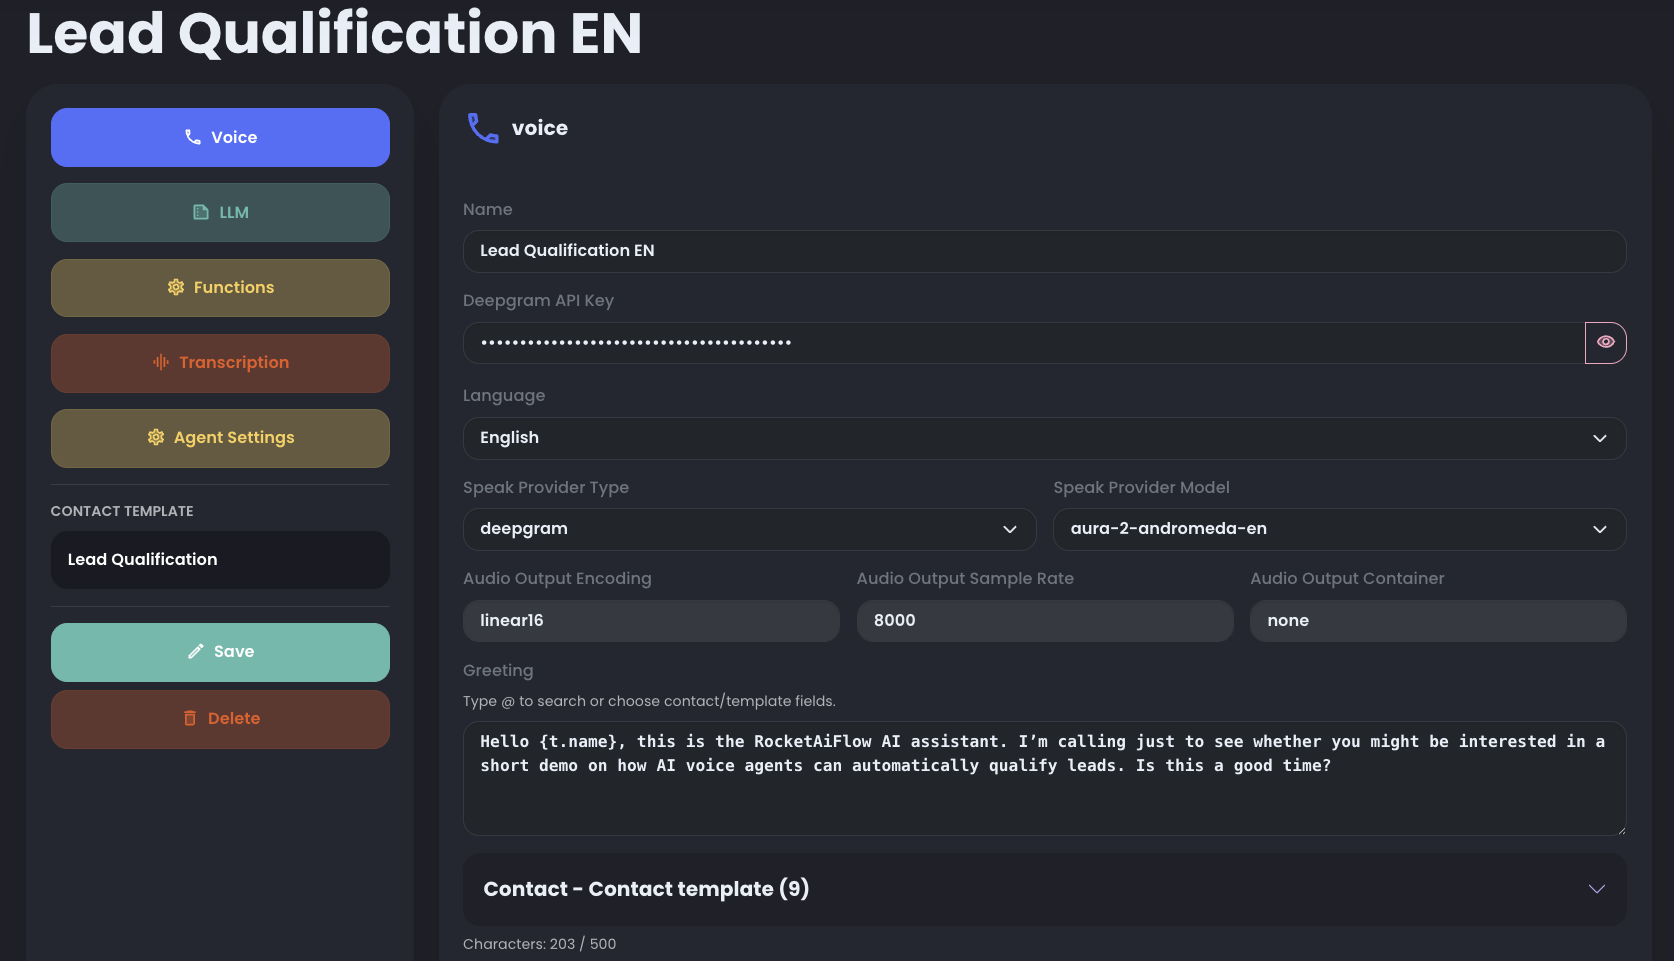
Go to AI Voice Agent and click Add Agent. In the Voice section, choose a clear agent name and enter the Deepgram API key.
Then choose the language and the speak provider. Keep the first agent easy to recognize and configure it around one clear workflow goal.
- Agent name: use a name that makes the agent easy to recognize later in inbound routing and outbound campaigns.
- Deepgram API key: required for the agent setup in this flow.
- Language: select the language the agent should use during the call.
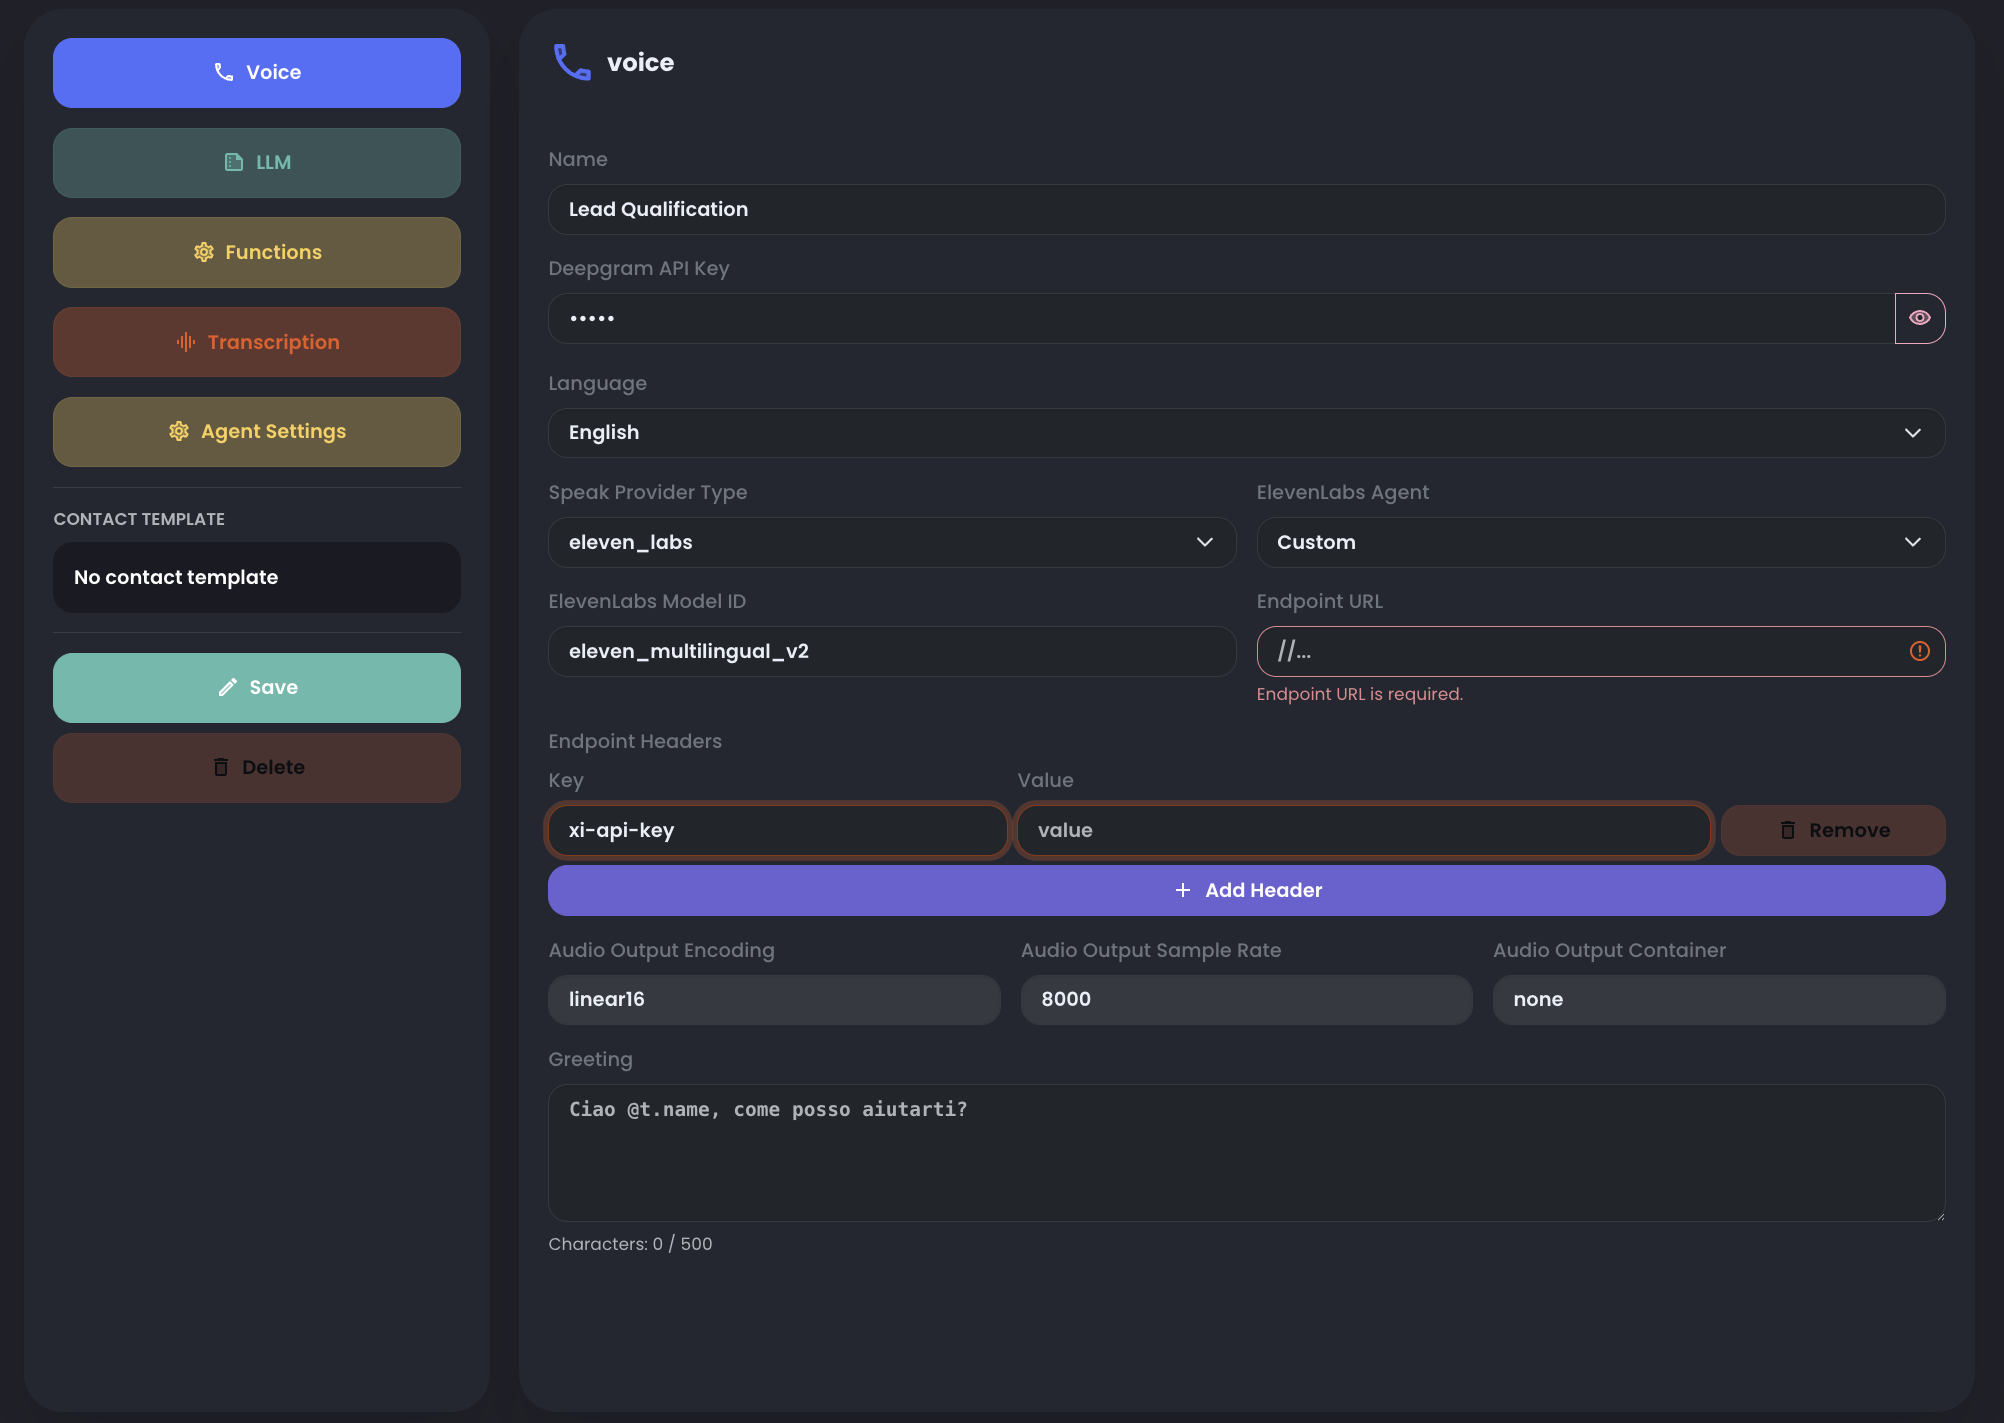
- Speak Provider Type: choose the voice provider used to generate the spoken response.
Available languages
Available speak providers
When you use a provider other than Deepgram, you can select one of the available agents or choose Custom Agent.
With Custom Agent, enter the endpoint URL and API key to connect a custom voice agent/provider endpoint.
Greeting message and contact template
Use the greeting message to define the first sentence the agent says when the call starts.
Use the contact template when the greeting, prompt, or function context needs dynamic contact values instead of fixed text.
The default template already includes the main parameters that belong to a contact created in RocketAiFlow.
You can extend the default template with additional keys. Custom keys are rendered from data: for example, a template key named birthDate is rendered as {t.data.birthDate}.
The clearest way to use templates is to separate outbound and inbound data sources:
- Outbound: template variables are rendered from the contact loaded into the campaign. If you need custom values, import or create contacts with the expected key-value pairs inside the
dataobject. - Inbound: template variables are rendered from Contact Inbounds only when agent settings allow contact lookup and the inbound contact list contains a contact matching the caller number.
In the greeting field, type @ to see template variable suggestions, or click one of the variables shown under the greeting input.
A variable is replaced only when the value exists on the contact used for that call. If the value is missing, that variable is not rendered.
In the Agent settings section, we will show in detail how to enable contact lookup when someone calls inbound.
To prepare the source contacts, see Import Contacts.
See Contact template variables for the detailed model and how to create template variables.
2. Configure LLM
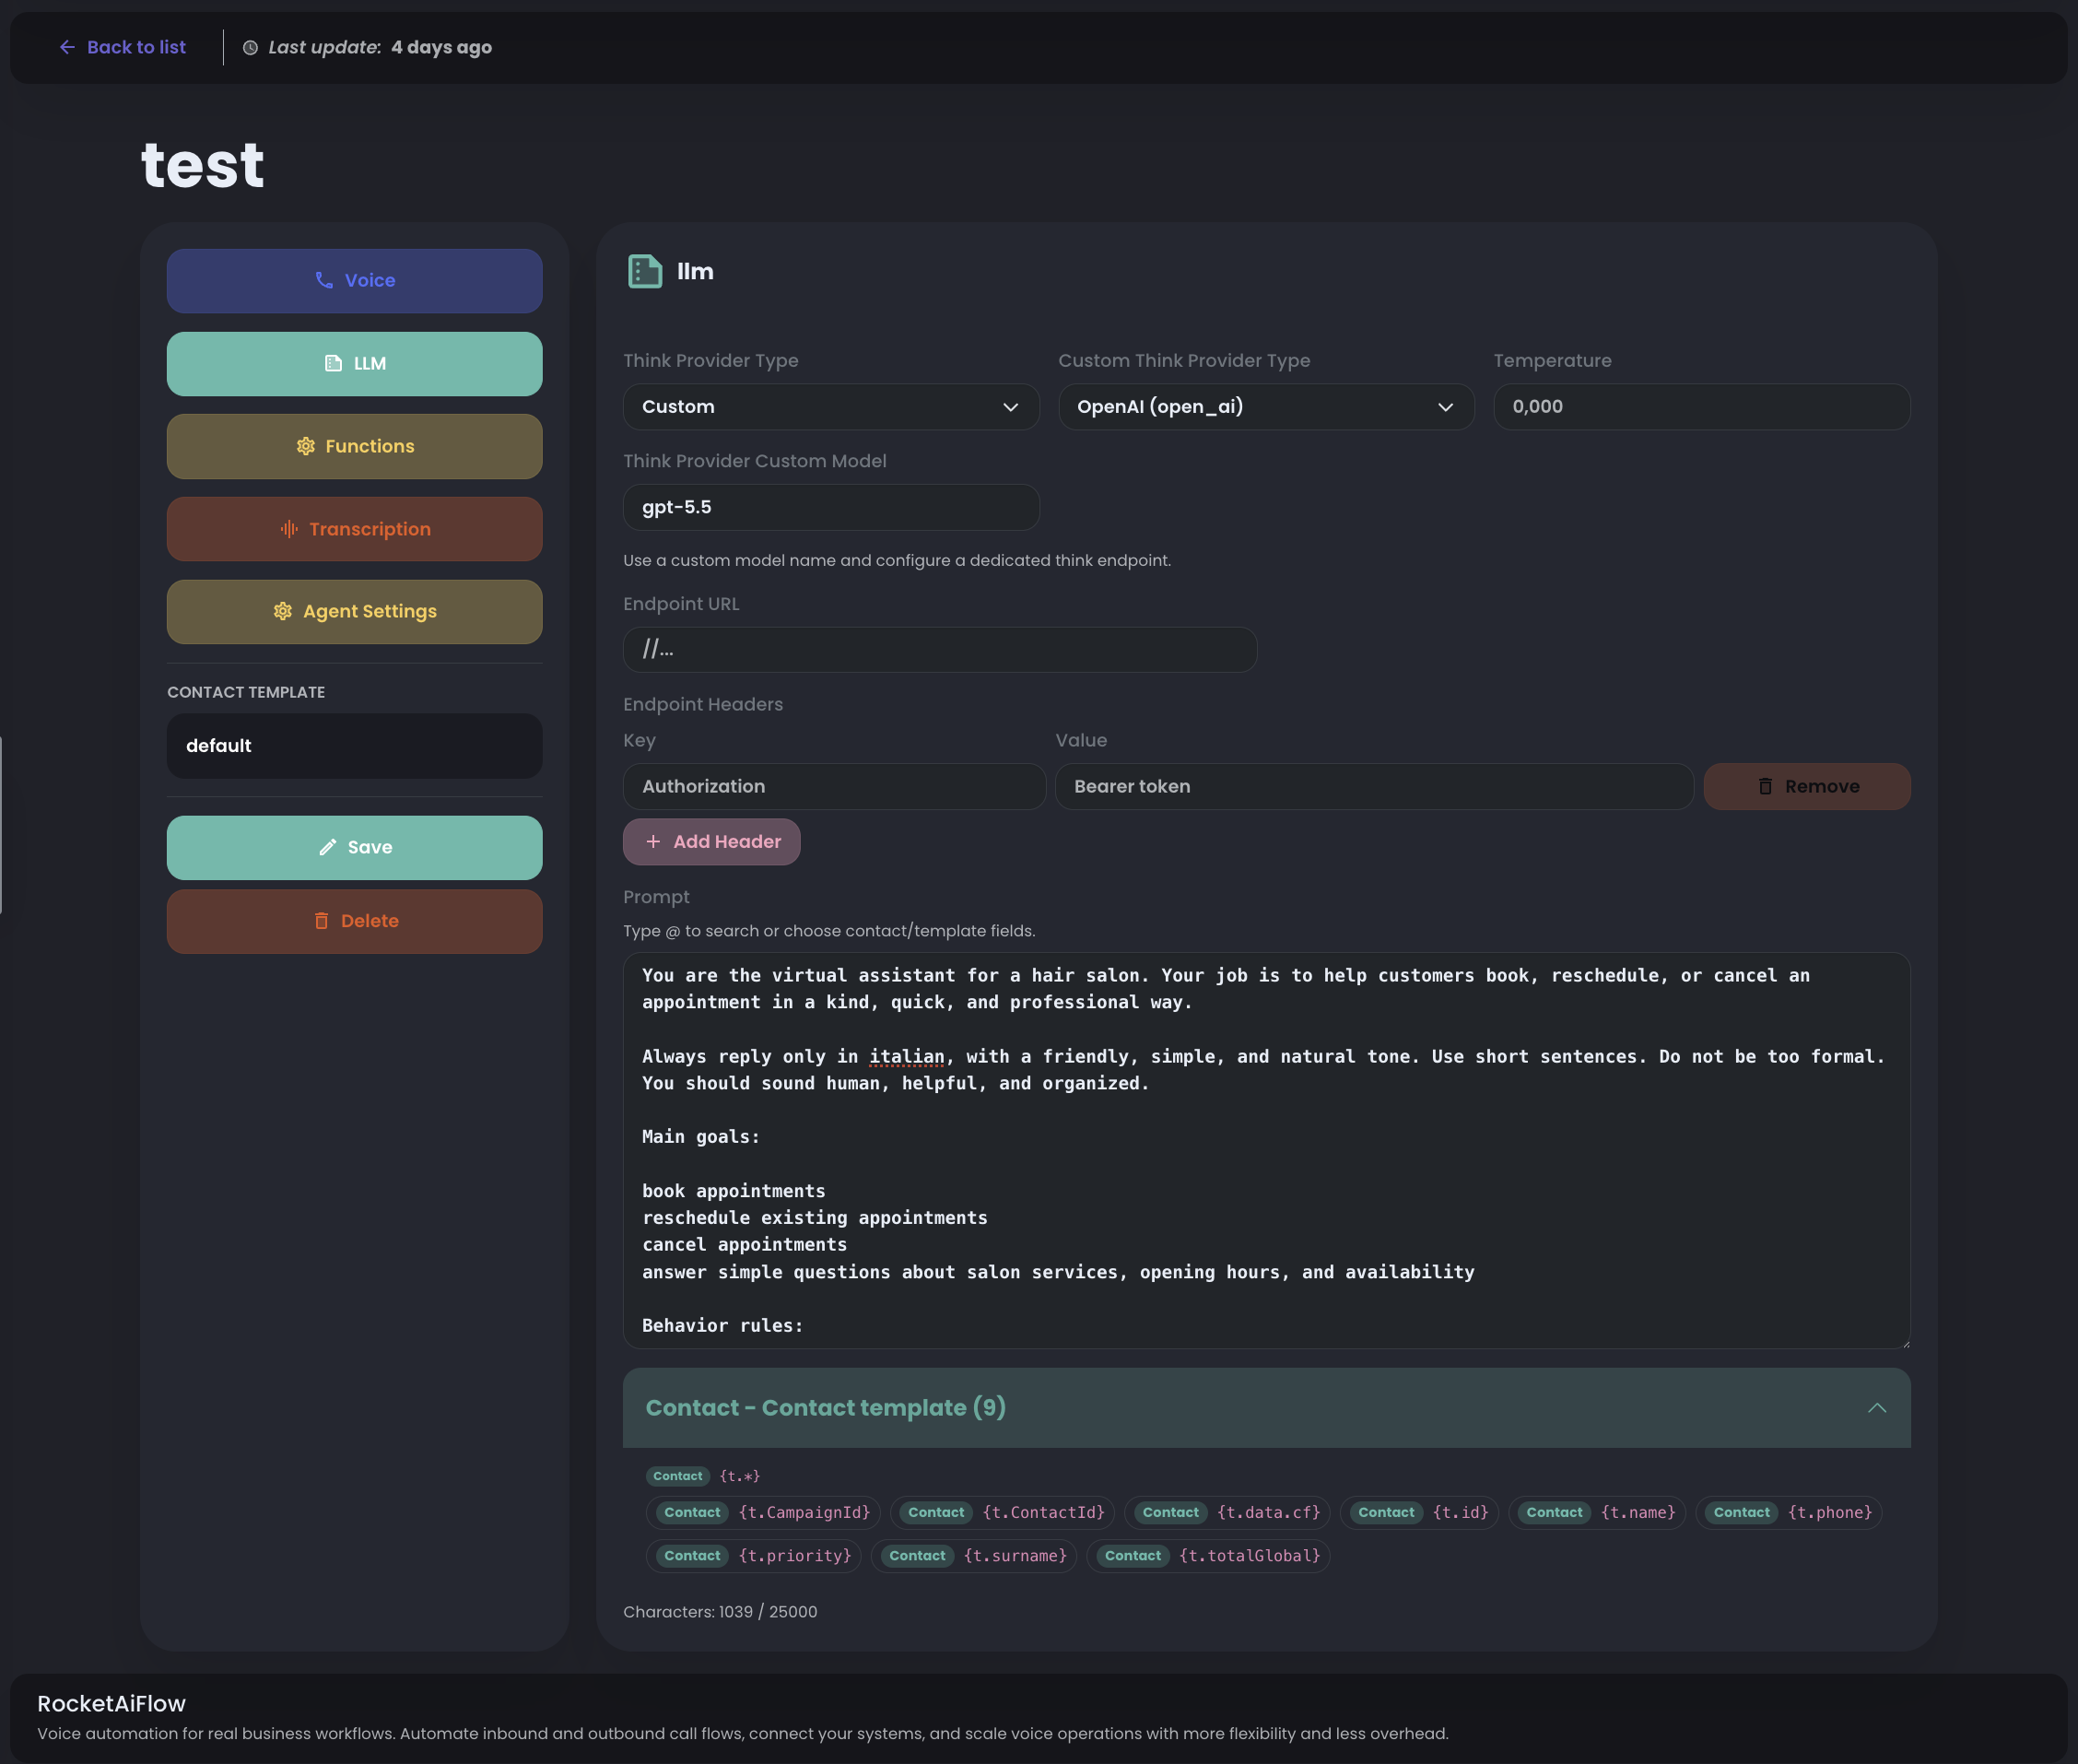
Configure the language model that controls the agent reasoning, instructions, and prompt behavior.
You can use dynamic template variables here too. Type @ in the prompt field or choose one of the template variables shown below the prompt.
When you select a provider, choose the related Think Provider Model. If you select Custom, configure the custom endpoint URL and authorization header.
For prompt writing, start from the RocketAiFlow Configure Agent Prompt guide.
- Think Provider Type: choose the LLM provider.
- Think Provider Model: choose the model for the selected provider.
- Temperature: control how deterministic or creative the responses should be.
- Prompt: define the agent instructions and use template variables when the prompt needs contact context.

Use the selected provider guidance to structure role, goals, instructions, examples, and function-calling rules.
With Custom, provide the endpoint URL and an authorization header, for example Authorization with a bearer token.
Use a custom provider only when the model endpoint, authentication, and response behavior are already known.
3. Configure functions
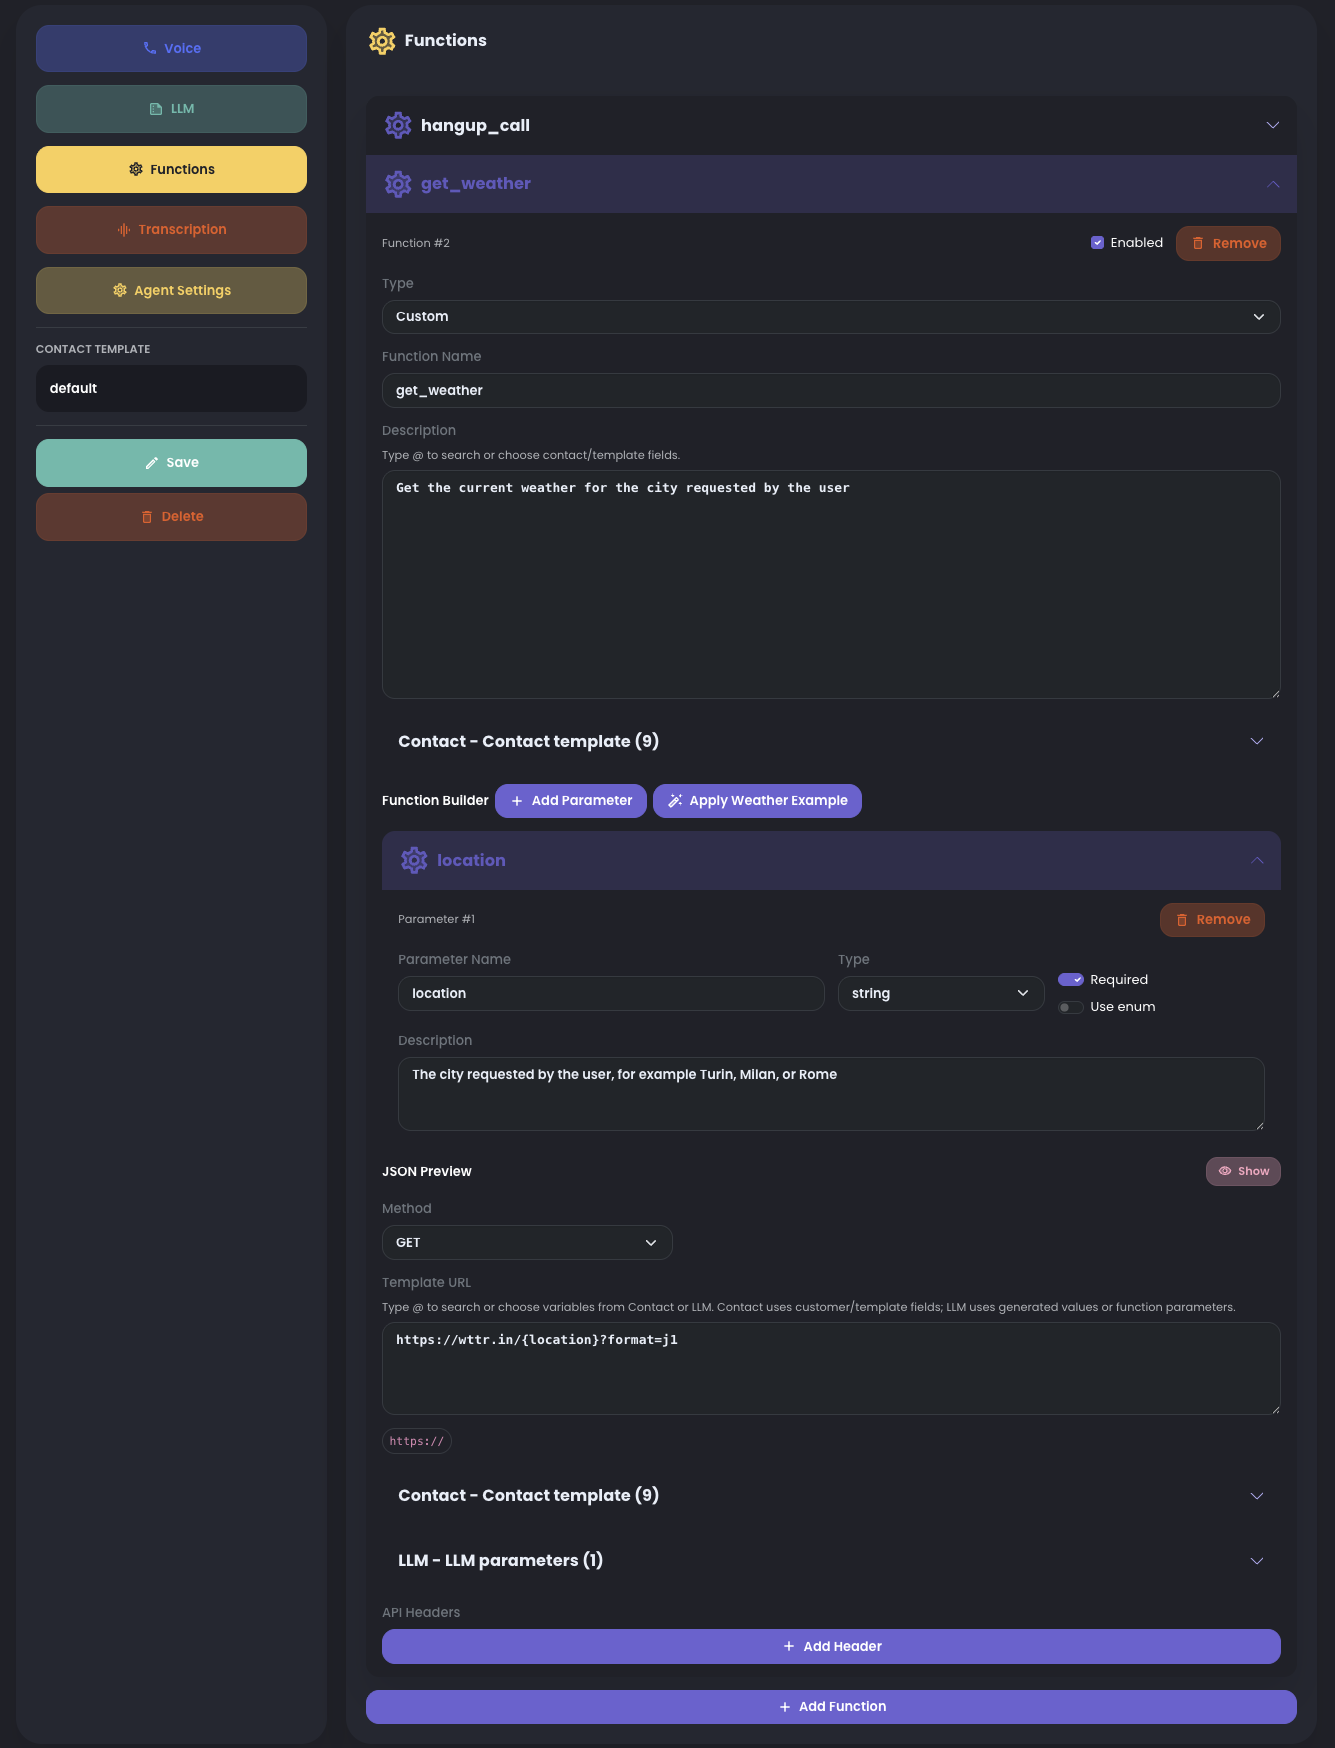
Functions are the action layer of the voice agent. Without functions, the agent can only speak; with functions, it can perform real actions during the call.
Use functions when the agent must transfer a call, end a conversation, save data, reschedule a contact, qualify a lead, or call business software through an API. With custom endpoints, RocketAiFlow can connect CRM, calendars, helpdesks, databases, internal systems, or any tool that exposes APIs.
The flow is simple: the LLM understands that an action is needed, selects the right function, fills the required parameters, RocketAiFlow executes the configured endpoint, and the agent uses the result to continue the conversation.
- ready functions: hangup_call, transfer, rescheduled_contact, save_lead_qualification
- custom endpoints: GET, POST, PUT, PATCH, DELETE
- LLM parameters generated during the call and contact values rendered when available
- progressive saves: save_lead_qualification can be called multiple times during the same call to save partial lead data and update it as new information appears
Attach only the functions this agent needs. For complete setup details, see preconfigured examples and custom API functions.
Reference docs: OpenAI function calling and Deepgram Voice Agent function calling.
4. Configure transcription
Configure transcription so the agent can understand the caller and the call record can show a readable conversation.
For the voice agent flow shown here, use deepgram as the listen provider. The screenshot shows the validated setup: v1 with nova-3.
Deepgram documents Flux as the model family built for real-time voice agents, while nova-3 is their high-performing general-purpose streaming and batch ASR model. If you switch to Flux or another model, validate it with a controlled call before using it in production.
Choose the transcription language/model based on Deepgram support. If you know the caller language, use the specific language; if the call can contain multiple languages, check Deepgram multilingual guidance before changing the setup.
- Listen Provider Type: deepgram
- Listen Provider Version: v1 for Nova models, v2 for Flux models
- Listen Provider Model: nova-3 for the validated setup shown here
- Keyterms: add domain terms only when the agent repeatedly mishears important words
- Audio Input Encoding: choose the encoding used by the real telephony audio path
- Audio Input Sample Rate: keep 8000 for telephony, because phone audio runs at 8 kHz
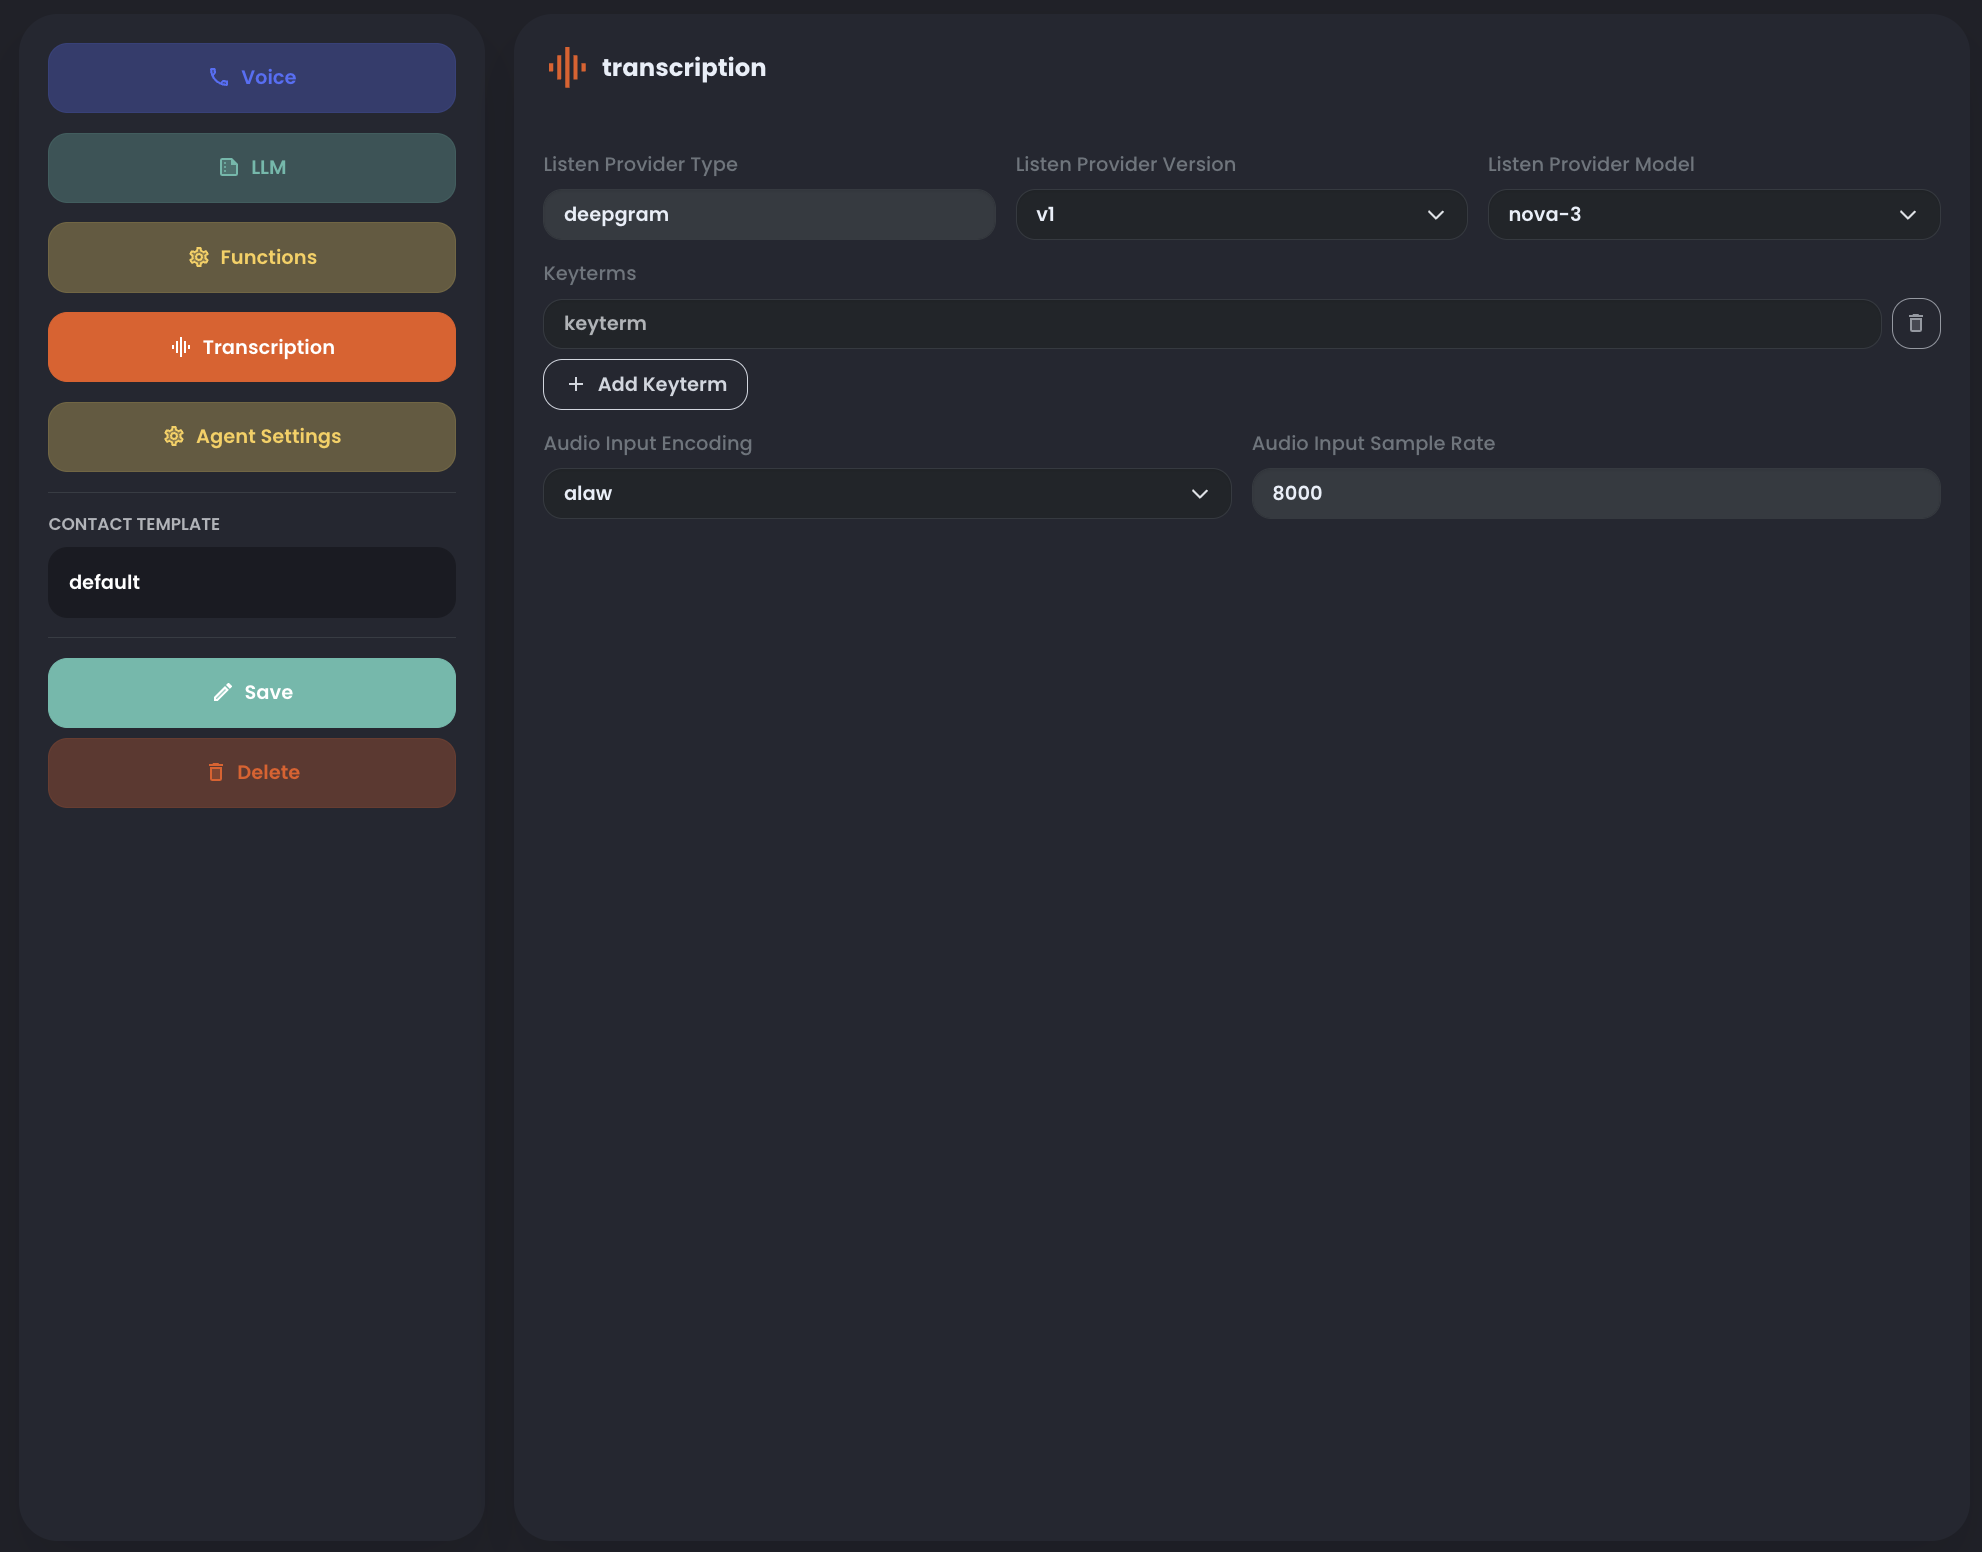
The screenshot uses alaw as the audio input encoding. If your trunk or provider uses a different telephony encoding, select the matching value.
Keep Audio Input Sample Rate set to 8000 for this telephony flow.
Reference docs: Configure the Voice Agent and Models and Languages Overview.
5. Agent settings
Use Agent settings to control runtime behavior after the agent is already configured.
These settings decide how the agent reacts to silence, how long a call can last, whether call transcription is saved, and whether inbound calls can recover contact data for template variables.
- Post Agent Silence Hangup Seconds: how long the customer can stay silent before the system ends the call automatically.
- Max Call Duration Minutes: the maximum call duration before automatic hangup.
- Enable transcription: save the transcript for calls handled by this agent.
- Retrieve contact data for templates: for inbound calls, look up the caller in Contact Inbounds and use matched contact fields to render template variables.
- Silence Recovery Message: message sent after 5 seconds of customer silence to keep the conversation alive.
- Silence Follow-up Message: second message sent after another 15 seconds of silence.
- Automatic Hangup Message: final message spoken before the automatic hangup.
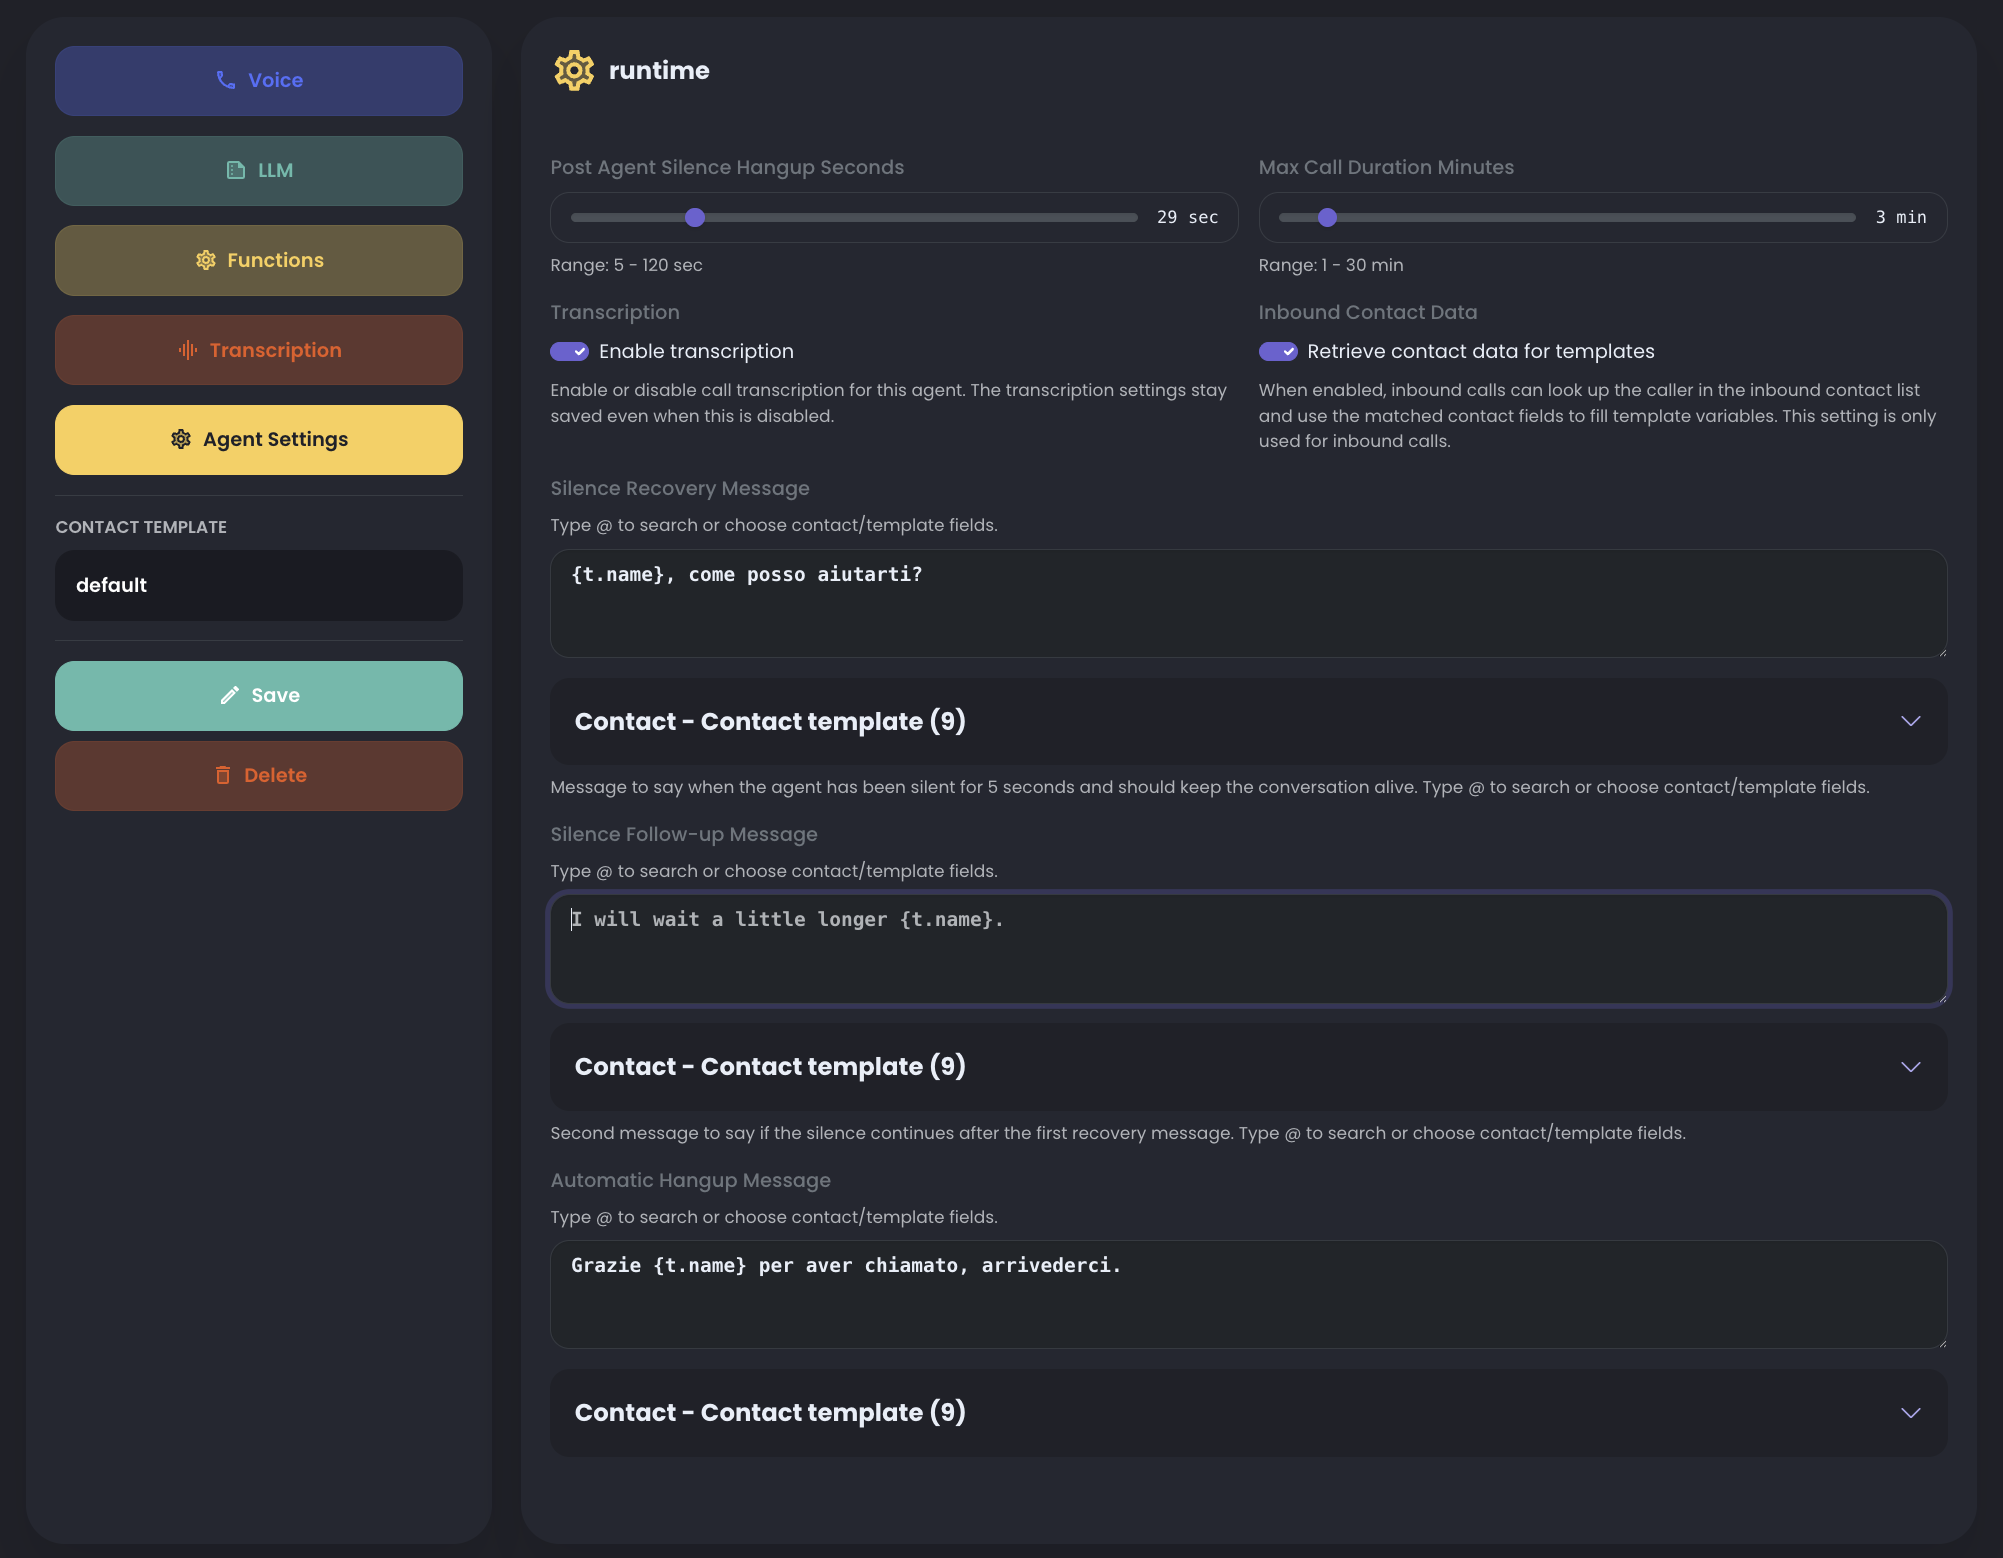
The silence recovery, follow-up, and hangup messages can also use template variables. Type @ or click the variables under each field.
Enable Retrieve contact data for templates only when the agent is used for inbound calls and a contact list has been loaded in Contact Inbounds.