Asterisk-based PBX Systems
Telephony
Transfer calls between RocketAiFlow and Asterisk-based PBX systems through a PJSIP trunk.
This integration was built using a static PJSIP trunk between Asterisk and the remote provider/PBX.
Use this integration when your environment uses Asterisk, FreePBX, or another Asterisk-based PBX and you want RocketAiFlow agents to receive calls, place campaign calls, or hand calls off to real operators.
How call handoff works
RocketAiFlow uses the configured trunk as the telephony path between the AI agent and the PBX.
During a call, the agent can keep the conversation, end the call, or call a transfer function when the customer needs a real operator.
- The call enters or leaves RocketAiFlow through the configured Asterisk/PJSIP trunk.
- The AI voice agent handles the conversation and decides whether a handoff is needed based on the prompt and enabled functions.
transfer,transfer_call, ortransfer_to_servicesends the destination extension, number, or service selected by the workflow.- Asterisk routes the destination using the configured context. If no custom transfer context is selected in the function, RocketAiFlow uses the default context
raf-internal. - After the test, validate the call in Call Records and check the trunk state in monitoring.
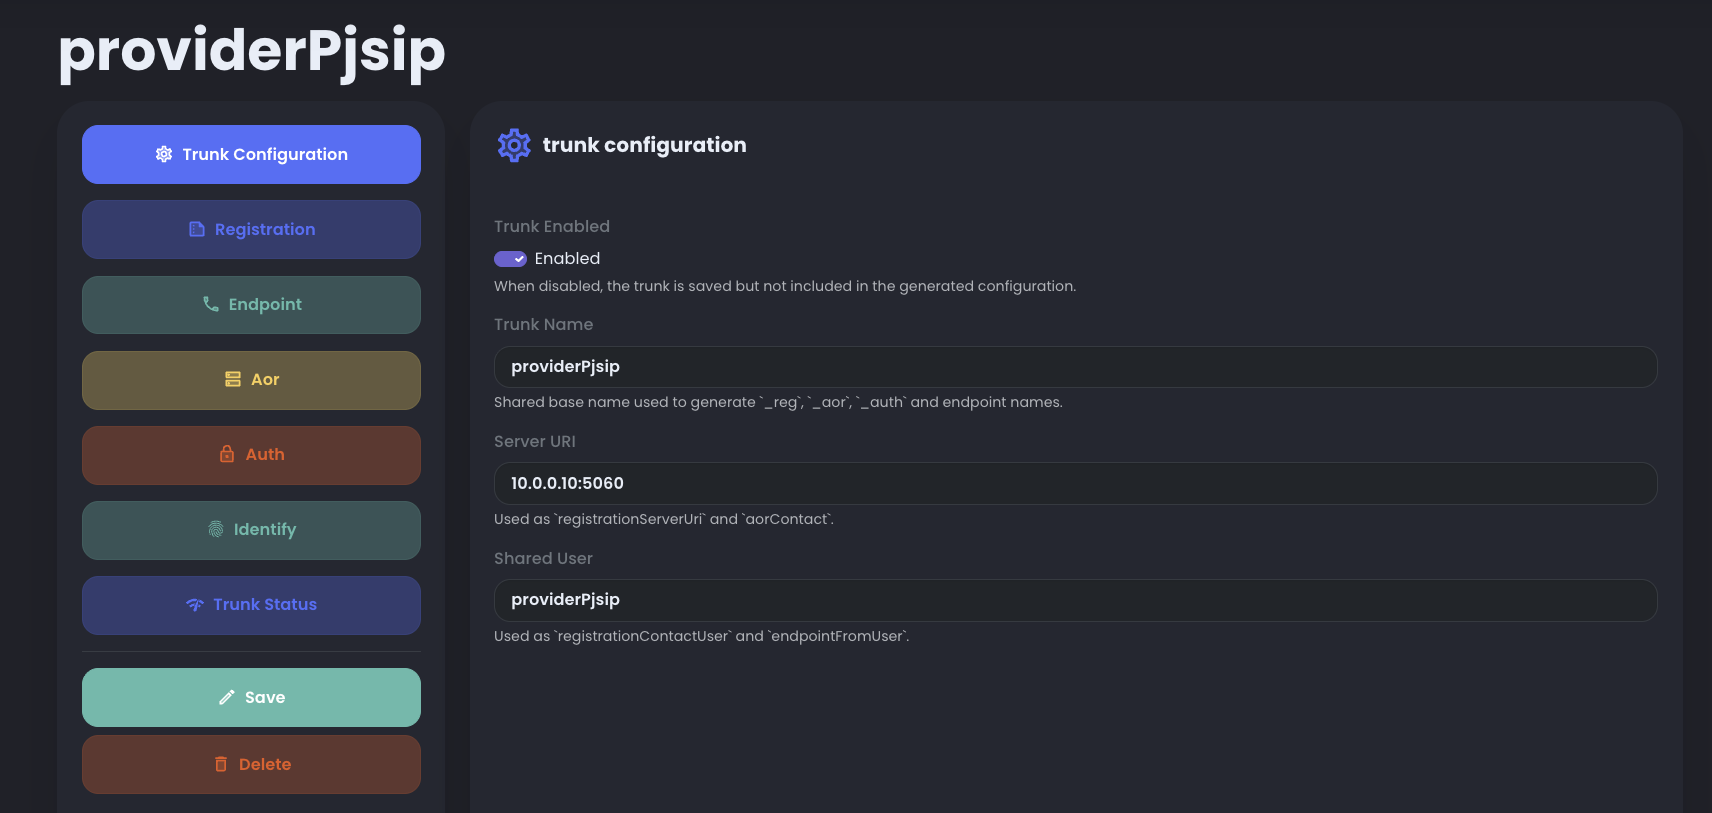
PJSIP configuration and RocketAiFlow trunk
Install this configuration on the Asterisk PBX server you want to integrate.
Place the block in the Asterisk PJSIP configuration, usually /etc/asterisk/pjsip.conf, or in a file included by pjsip.conf. On FreePBX-based systems, use the custom PJSIP include file required by your installation instead of editing generated files directly.
On the RocketAiFlow side, a default trunk named providerPjsip is already prepared. Before enabling it, set the correct IP address of your Asterisk/PBX server, then replace the default password with the password used in this PBX configuration.
The PBX configuration defines transport, AOR, auth, endpoint, and identify rules for RocketAiFlow, which registers or sends calls to that PBX.
;=============== TRANSPORT SECTION
[transport-udp]
type=transport
protocol=udp
bind=0.0.0.0:5060
local_net=172.22.0.0/24      ; <--- Replace with your PBX local network
external_signaling_address=YOUR_PUBLIC_IP
external_media_address=YOUR_PUBLIC_IP

; If you use a domain/DDNS instead of a static public IP, use:
; external_signaling_address=pbx.yourdomain.com
; external_media_address=pbx.yourdomain.com

; --- AOR used by RocketAiFlow REGISTER requests ---
[providerPjsip_aor]
type=aor
contact=sip:10.0.0.10:5060      ; <--- Replace with the RocketAiFlow server IP address
qualify_frequency=3

; --- AUTH: same credentials used by RocketAiFlow ---
[providerPjsip_auth]
type=auth
auth_type=userpass
username=providerPjsip
password=CHANGE_ME_PROVIDER_PJSIP_PASSWORD      ; <--- Replace with the RocketAiFlow trunk password

; --- ENDPOINT that receives calls from RocketAiFlow ---
[providerPjsip]
type=endpoint
transport=transport-udp
context=raf-pjsipProvider      ; <--- Dialplan context where calls from RocketAiFlow enter
disallow=all
allow=ulaw
aors=providerPjsip_aor
outbound_auth=providerPjsip_auth
auth=providerPjsip_auth
force_rport=no
direct_media=no
from_user=providerPjsip
from_domain=10.0.0.10      ; <--- Replace with the RocketAiFlow server IP address
rewrite_contact=no
rtp_symmetric=no

; --- IDENTIFY: links the RocketAiFlow IP or host to this endpoint ---
[providerPjsip_identify]
type=identify
endpoint=providerPjsip
match=10.0.0.10          ; <--- Replace with the RocketAiFlow server IP address

;=============== End of configuration file
Set up the integration in RocketAiFlow
After enabling the default providerPjsip trunk, configure the RocketAiFlow workflow based on the direction you want to test.
Inbound path
Open Inbound AiAI Inbound Routing, select the providerPjsip trunk and choose the agent. Every call that arrives on extension providerPjsip and context raf-from-voip-provider is handled by the selected agent.

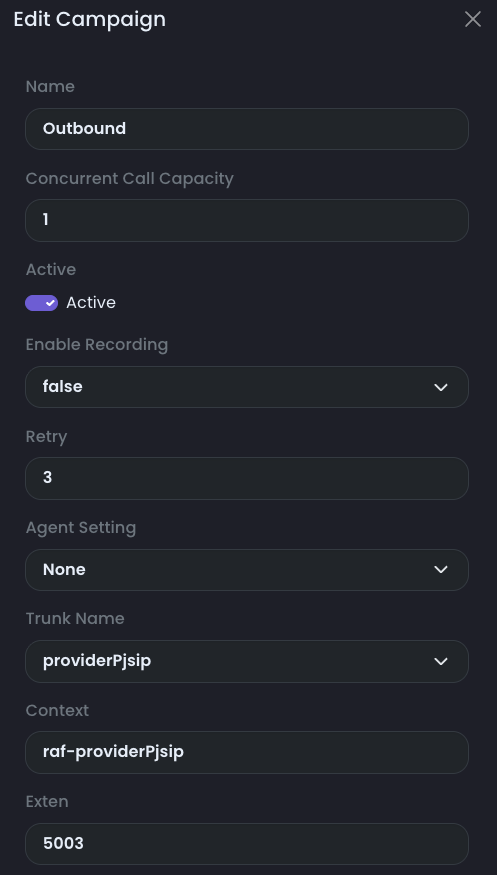
Outbound path
Open AI Dialer FlowsDialer Campaigns and choose the trunk based on where calls should go. Select providerPjsip if outbound calls must reach your PBX.
For the providerPjsip path, set Context to raf-providerPjsip, then set Exten to the extension or number you want to contact on your server. That extension must be routed by your PBX in the raf-pjsipProvider context.
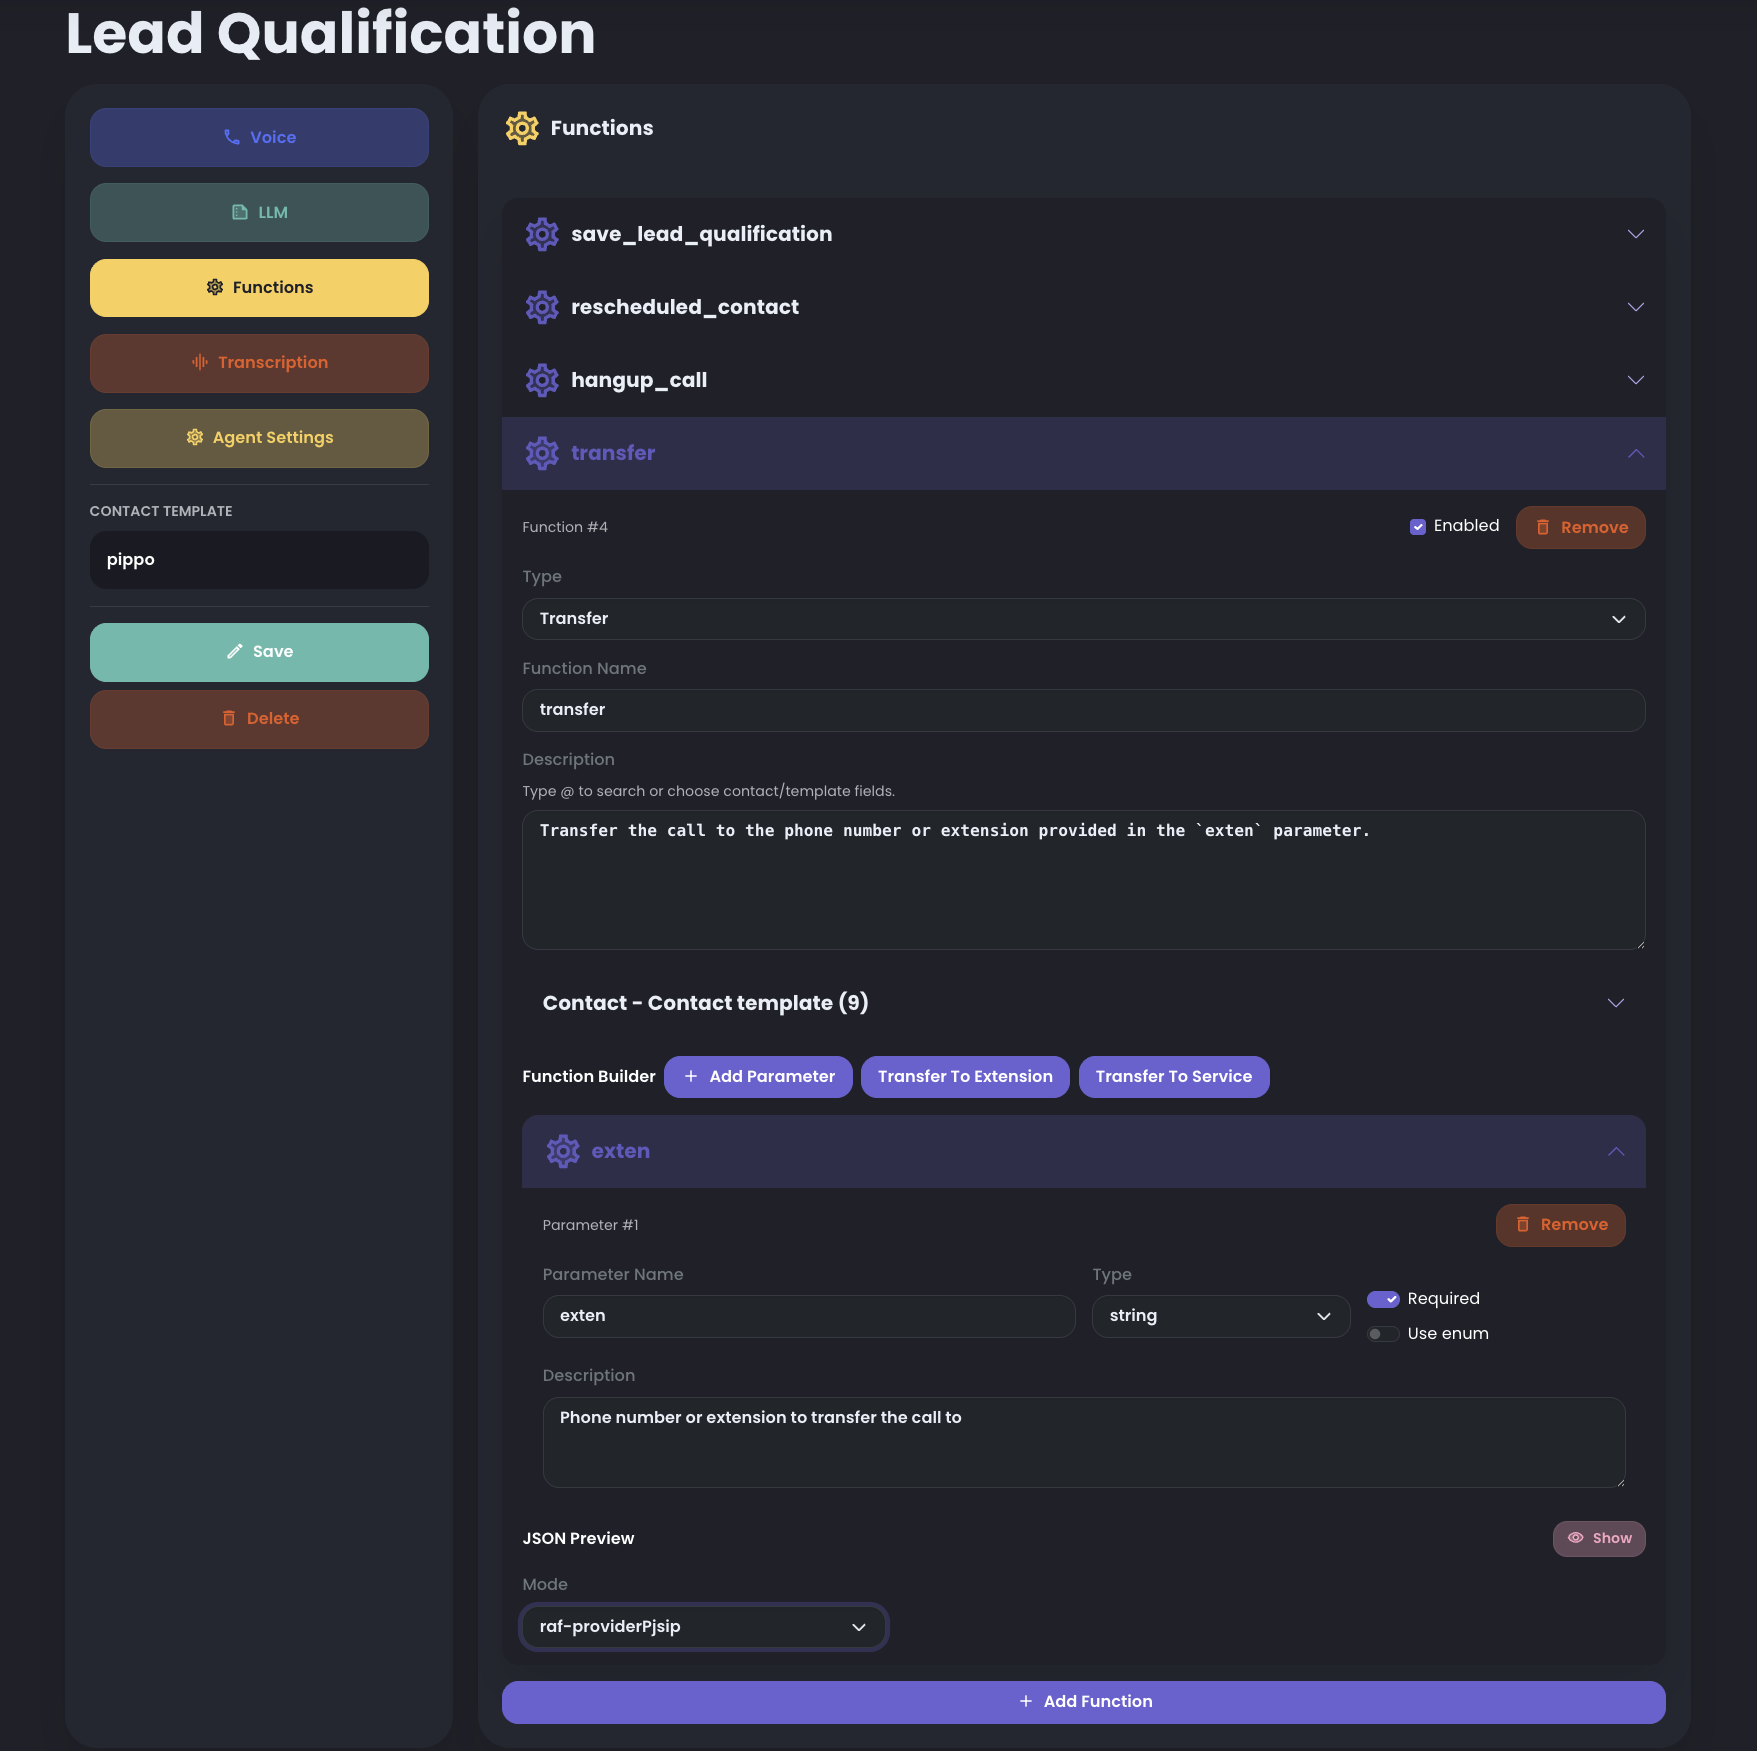
Transfer functions
When creating transfer functions, select the raf-providerPjsip context and set exten to the extension or number you want to contact on your server. This makes RocketAiFlow dial through the configured trunk, so transferred numbers land on the PBX side in the raf-pjsipProvider context.
Test the integration
Start with one controlled test before widening the routing or campaign scope.
- Confirm the trunk is registered before the test.
- For inbound, call the number routed through the Asterisk trunk and confirm the agent answers.
- For outbound, start a campaign with one contact and Concurrent Call Capacity set to 1.
- Ask the agent to transfer to a real operator or supported department.
- Confirm that Asterisk receives and routes the destination correctly.
- Review Call Records, transcript, timing, final status, and trunk monitoring after the call.